Satechi CubeDock Review: The Best Thunderbolt 5 Dock for Apple Users?
Some of the links in this post are affiliate links, which means I may earn a small commission if you choose to make a purchase at no extra cost to you. As an Amazon Associate, I earn from qualifying purchases. Read my full Ethics & Affiliate Relationship Disclaimer.
If you want a single-cable setup that can power your computer, run external displays, connect fast storage, and keep the rest of your desk gear plugged in, the Satechi CubeDock is one of the more interesting Thunderbolt 5 docks out right now.
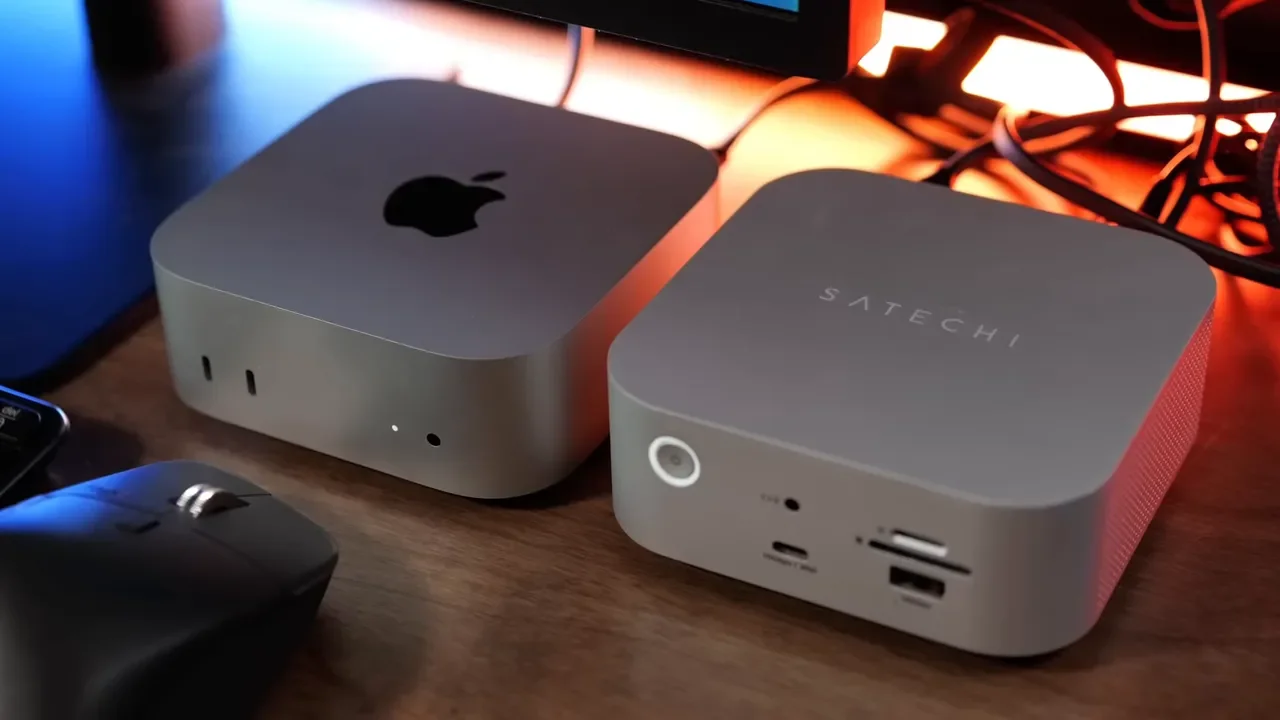
The big reason it stands out is simple. It looks almost exactly like a Mac mini. It has that silver aluminum Apple-style finish, it is nearly the same size, and it feels like the kind of accessory that was designed specifically to live next to a Mac mini, Mac Studio, or a modern MacBook. But this is not just about looks. The CubeDock combines a Thunderbolt 5 dock with a built-in NVMe SSD enclosure, and that makes it a lot more versatile than a typical desktop dock.
I tested it with an M4 Max Mac Studio along with a mix of Thunderbolt 4 and Thunderbolt 5 laptops, and overall it has been a really solid dock. It is not perfect, and there are a few trade-offs you should know about, but there is a lot to like here.
Table of Contents
Design: A Dock That Actually Matches Apple Hardware
The first thing you notice is the design. Satechi absolutely leaned into the Apple aesthetic here, and honestly, they nailed it. The CubeDock is compact, clean, and finished in silver aluminum, so it looks right at home on a Mac desk.
If your setup includes a Mac mini, this thing almost looks like an accessory Apple could have made. It is also compact enough to work nicely with a MacBook-based desk setup, and Satechi says it is fine to stack it on top of a Mac mini or Mac Studio if you want to save space. That kind of physical compatibility matters more than people think. A lot of docks work fine but look like generic office hardware. The CubeDock feels like it belongs in the same setup as Apple displays and aluminum desktops.
Thunderbolt 5 Compatibility and How It Connects
One funny detail about the CubeDock is that it is a Thunderbolt 5 docking station, while a standard Mac mini still tops out at Thunderbolt 4 unless you step up to a higher-end Pro configuration. That does not make the dock overkill. It just means you are getting headroom for faster storage, more bandwidth, and better long-term flexibility.
The dock is fully backward compatible with older Thunderbolt devices, including Thunderbolt 4 systems. I used it with both Thunderbolt 4 and Thunderbolt 5 machines, and it worked well across the board. You just need to understand that if your computer does not support Thunderbolt 5, some things scale back a bit. In practical terms, that usually means:
Lower SSD performance from the built-in NVMe enclosure
Less available bandwidth when multiple displays and peripherals are connected
More noticeable performance trade-offs when the dock is heavily loaded
Setup is straightforward. Plug in the external power brick, connect a single Thunderbolt cable to your computer, and the dock takes care of the rest.
Port Selection: A Strong Layout for Apple-Centric Setups
Port selection is one of the CubeDock’s biggest strengths. Satechi did a good job balancing front-facing convenience with the kinds of ports you actually want permanently connected around back.
Ports on the Back
Three downstream Thunderbolt ports
2.5 Gigabit Ethernet
USB-A 10Gbps
USB-C 10Gbps
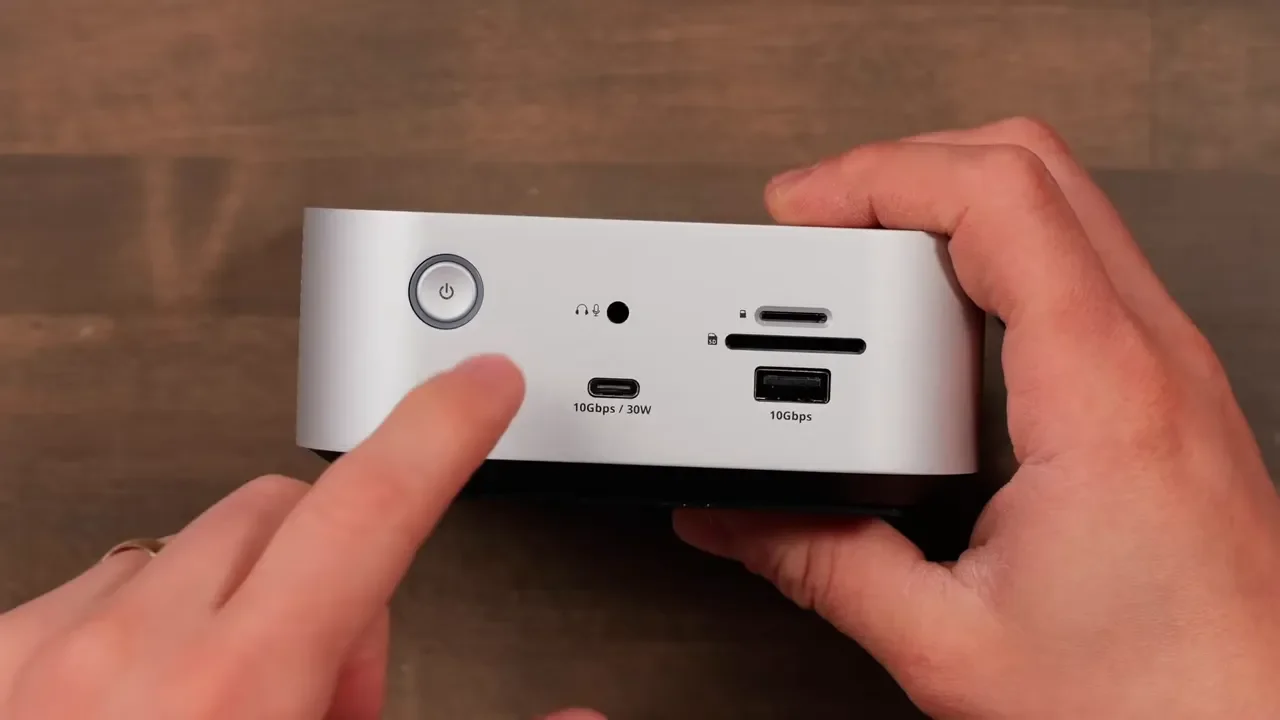
Ports on the Front
Power button to shut off connected devices
Headset and microphone combo jack
USB-C 10Gbps port with up to 30W charging
USB-A 10Gbps port
UHS-II SD card slot
MicroSD card slot
That front USB-C port is especially nice if you want to keep something like an iPad charged and connected. The SD and microSD slots are also useful if you deal with cameras regularly and want a cleaner desktop workflow. I also like that Satechi did not sacrifice Thunderbolt ports just to add HDMI. Personally, I would rather have more Thunderbolt flexibility, especially in a setup with Apple Studio Displays. If you need HDMI, a USB-C or Thunderbolt to HDMI adapter solves that easily.
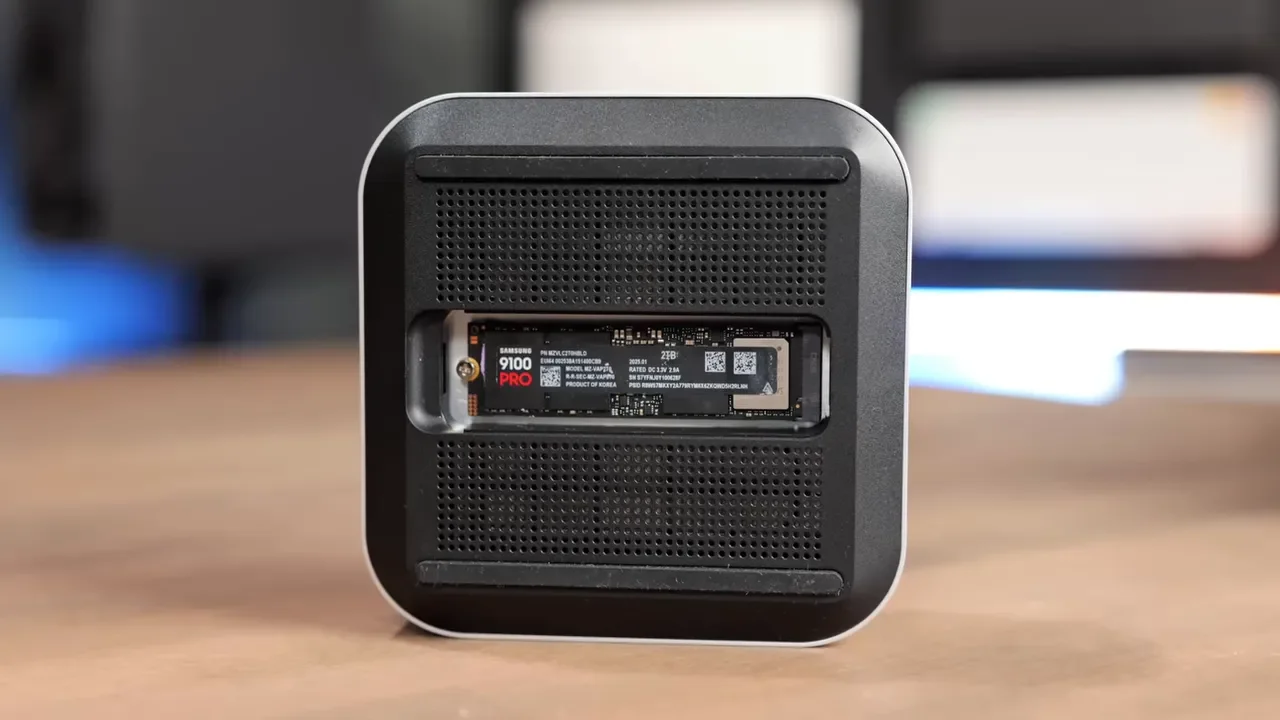
The Built-In NVMe SSD Slot Is the Real Headliner
The feature that makes this dock different from a lot of the competition is the built-in SSD enclosure on the bottom. You can install your own NVMe drive and use the CubeDock as both a hub and high-speed storage solution.

For a lot of people, that is a huge win. Instead of buying a Thunderbolt dock and then adding a separate Thunderbolt SSD enclosure, you get both functions in one compact unit.
Installing an NVMe Drive
The installation process is not difficult, but it is not fully tool-free either.
You need to:
Open the bottom access panel
Insert the NVMe drive at an angle
Use the slimmer thermal pad underneath the SSD
Place the other thermal pad on top of the SSD
Secure it with a Phillips screw
Once installed, the top thermal pad ends up sticking to the cover. It works, but it is a little fiddly compared to a truly tool-free design. That is one place where I think Satechi could have made setup a bit friendlier.
As for SSD choices, I tested with a Samsung 990 Pro and had great results. If you are shopping for drives, these are the ones I would look at:
Real-World Use: Excellent With Laptops, Desktops, and Studio Displays
What I like most about the CubeDock is that it is genuinely flexible. It works well with laptops and desktops, and the port layout makes sense for both.
In my setup, I have been using it with dual Apple Studio Displays, a Stream Deck XL, an Allen & Heath audio device, and a Rodecaster Video. Even with all of that connected, the dock has been stable. I did not run into disconnect issues, random dropouts, or the annoying flakiness that sometimes shows up with overloaded docks.
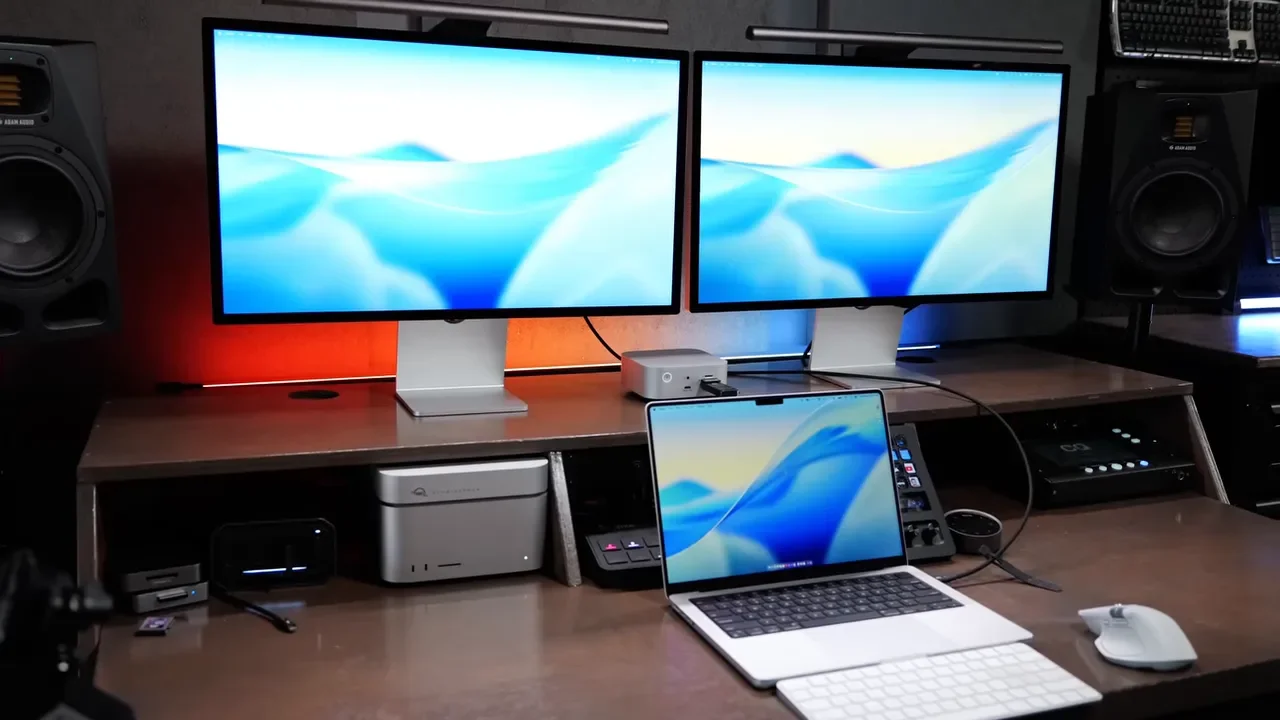
That reliability matters a lot more than spec-sheet bragging. A dock can have all the right ports in the world, but if peripherals disconnect or storage drops off mid-session, it is useless. The CubeDock has been dependable in day-to-day use.
Display Support and MacOS Limitations
Display support here is good, but there are some limitations, and some of them come from macOS rather than the dock itself. The most important thing to know is this:
On supported higher-end Apple silicon systems, the dock can handle up to triple display output
On other Macs, it generally tops out at two external displays
That is less about the CubeDock falling short and more about how Apple handles display support by chip tier. The dock also supports the 120Hz Apple Pro Display XDR, which is worth mentioning for anyone building a high-end Apple workstation. If your workflow depends on multiple external monitors, always check what your specific Mac can support before blaming the dock. With Apple hardware, the computer itself often determines the ceiling.
SSD Performance Testing: Fast, But Bandwidth Still Matters
Performance from the built-in NVMe enclosure is strong, especially on a Thunderbolt 5 system. I tested the dock with a Samsung 990 Pro and even used it while editing a three-camera 6K multicam project in Final Cut Pro. It handled that without issue.
Just as important, the SSD stayed connected reliably. I left the dock powered on and plugged in, and I did not run into storage disconnects. For a dock with integrated storage, that is a really big deal.
Performance on a Thunderbolt 5 Mac
With an M4 Max Mac Studio and dual Studio Displays connected, I saw roughly 5100 MB/s read and write. That is seriously impressive for an integrated dock enclosure. With the dock connected directly to the Mac Studio and no displays attached, speeds were even higher.
Performance on a Thunderbolt 4 Mac
Using an M4 Mac mini with Thunderbolt 4, I got:
About 3200 MB/s read and write with no displays connected
About 3200 MB/s read and 2400 MB/s write with one Studio Display attached
About 1200 MB/s with dual Studio Displays attached
That is the key trade-off with a dock like this. Even with Thunderbolt 5, bandwidth is not unlimited. The more displays and peripherals you run through the dock, the more storage performance can drop.
So if your top priority is maximum NVMe speed, the best-case setup is simple:
Use a Thunderbolt 5 computer if possible
Avoid running displays through the dock when chasing peak SSD performance
Keep especially bandwidth-heavy devices distributed intelligently
That said, even reduced speeds here are still fast enough for serious workflows, including video editing, project storage, and Time Machine backups.
What You Can Actually Use the SSD For
Once installed, the NVMe drive shows up just like an external SSD on your Mac. That means you can use it for all the normal storage tasks you would expect, including:
Editing video projects directly from the dock
Storing media libraries
Running Time Machine backups
Keeping large files off your internal SSD
Because the enclosure is integrated into the dock, it also reduces cable clutter. Instead of one more external SSD box on your desk, storage is built into the same device already handling your connectivity.
Cooling and Fan Noise
The CubeDock uses active cooling, so yes, there is a fan inside. It pulls air in from the sides and exhausts hot air out the back. You can actually feel the airflow when it is running.

In practice, the fan noise did not bother me. I only really noticed it when I put my ear up close to the vents. If your desk is in an ultra-quiet room and you are sensitive to any background sound, you may care more about this than I did. For most setups, I do not think it is going to be a deal-breaker. Given that the dock combines Thunderbolt 5, multiple powered ports, and an NVMe enclosure, active cooling makes sense.
Power Delivery: Strong, With One Caveat
The CubeDock can provide up to 140W of charging to your computer, which is excellent for a dock this compact. That makes it especially appealing if you want a single-cable MacBook setup. Each Thunderbolt port can provide up to 15W, and the front USB-C port can deliver up to 30W, which is great for charging tablets and smaller devices.
My one concern here is the size of the included power brick. It is a 180W adapter, and when you add up the advertised charging potential across the host connection and all the accessory ports, the math starts to feel a little tight. In my own testing, I did not run into power problems. But if you are the kind of person who is going to plug in everything at once and expect every port to deliver max power simultaneously, that is the one area where I would keep expectations realistic.
What Comes in the Box
Satechi includes the essentials:
The CubeDock itself
A Thunderbolt 5 cable
The external power brick
I am glad they included a longer Thunderbolt 5 cable instead of a tiny one. That makes the dock much easier to position if you are using it with a laptop rather than parking it right next to a desktop.
The Main Downsides
There are really only a few cons here, but they are worth calling out.
1. I Wish It Had More Rear USB
The back panel could really use another USB-A or USB-C port. As it is, I found myself using front-facing ports for devices I would rather hide around the back, which makes the desk a little less clean.
2. Ethernet Is Only 2.5GbE
Some people are absolutely going to want 10Gb Ethernet, especially on a premium dock. I get that. That said, after testing a lot of docks, I have noticed that models adding 10GbE often give up something else, usually a Thunderbolt port. In this case, I am okay with 2.5GbE because Satechi kept three downstream Thunderbolt ports, and that is more useful to me in an Apple-focused setup.
3. The NVMe Installation Is Not Tool-Free
This is not a huge problem, but it is not quite as elegant as it could be. Requiring a Phillips screwdriver and dealing with thermal pads makes setup slightly more fiddly than it needs to be.
4. The Price Feels a Bit High
This is the biggest one. The CubeDock is good. I just think it should have been about $75 cheaper to feel like a total no-brainer.
Pricing and Value
The CubeDock is currently around $400. If you want to check current pricing, here is the Satechi CubeDock listing. At first glance, that sounds expensive, but it makes a little more sense when you compare it to buying two separate products:
A Thunderbolt 5 dock
A Thunderbolt 5 SSD enclosure
Buy those separately and you can easily end up over $500. The CubeDock bundles both into one compact piece of hardware, and that is where a lot of the value comes from.
How It Compares to Alternatives
OWC Studio Stack
The OWC Studio Stack comes in cheaper at around $330, but it is not a direct one-to-one comparison. It is larger, does not include a network port, does not have a headset jack, and does not include SD card slots in the same way. It does support both an SSD and a standard hard drive, which could be useful for some storage-heavy setups. It also has more USB-A emphasis, so the trade-offs really come down to your workflow.
Sonnet Thunderbolt Dock Option
Sonnet has a competing SSD-equipped dock for around $300 empty. One thing I do like there is having a faster Thunderbolt host-facing port on the front, which is handy if you want to keep high-speed external SSDs connected. But compared to the CubeDock, the Sonnet has fewer USB-C ports, leans more heavily on USB-A, and is made of plastic. Functionally it may work for some people, but it does not look nearly as clean on a desk.
Razer Dock
Razer also has a strong alternative in roughly the same price range. The issue there is layout. All the ports are on the back, and it has one fewer USB-C port. Depending on your desk, that may or may not matter, but I prefer the CubeDock’s mix of front convenience and rear permanence.
Who the Satechi CubeDock Is Best For
The CubeDock makes the most sense if you want a premium Apple-friendly dock that checks several boxes at once:
You want a dock that visually matches a Mac mini or Mac Studio
You want Thunderbolt 5 connectivity with solid backward compatibility
You want to add NVMe storage without a separate enclosure
You rely on Thunderbolt displays such as Apple Studio Displays
You care about keeping your desk compact and clean
If you need 10Gb Ethernet, a huge number of rear USB ports, or the absolute best price-to-port ratio, there are bigger and more utilitarian docks that may fit better. If your priority is having a compact, good-looking, versatile Thunderbolt 5 dock built around the Apple ecosystem, this one is very compelling.
Final Verdict
Overall, I really like the Satechi CubeDock. It looks great, feels purpose-built for Apple setups, offers a genuinely useful mix of ports, and the built-in NVMe enclosure adds real value instead of just being a gimmick. It has also been reliable in actual use, which matters more than any spec sheet.
The biggest thing holding it back is price. If it were around $75 less, it would be an easy recommendation for almost anyone building out a premium Mac desk. At its current price, it is still good, but you need to really want the design, the integrated SSD slot, and the Thunderbolt-heavy layout to justify it. For the right setup, though, this is one of the best Thunderbolt 5 docks Apple users can buy right now.