How to Use an iPad as a Free Second Monitor for Your MacBook (Sidecar Guide)
Some of the links in this post are affiliate links, which means I may earn a small commission if you choose to make a purchase at no extra cost to you. As an Amazon Associate, I earn from qualifying purchases. Read my full Ethics & Affiliate Relationship Disclaimer.
Apple Sidecar is one of those genuinely useful features that can sit in your settings for years without getting used. If you already own a compatible iPad, you have a portable second display for your MacBook, with no extra monitor or software required. You can run Sidecar wirelessly for a quick, clean setup or use a USB-C cable for a more reliable connection with charging and less latency. Here is how to get it working, how to arrange it properly, and when Sidecar actually makes sense for your workflow.
Table of Contents
What Is Sidecar?
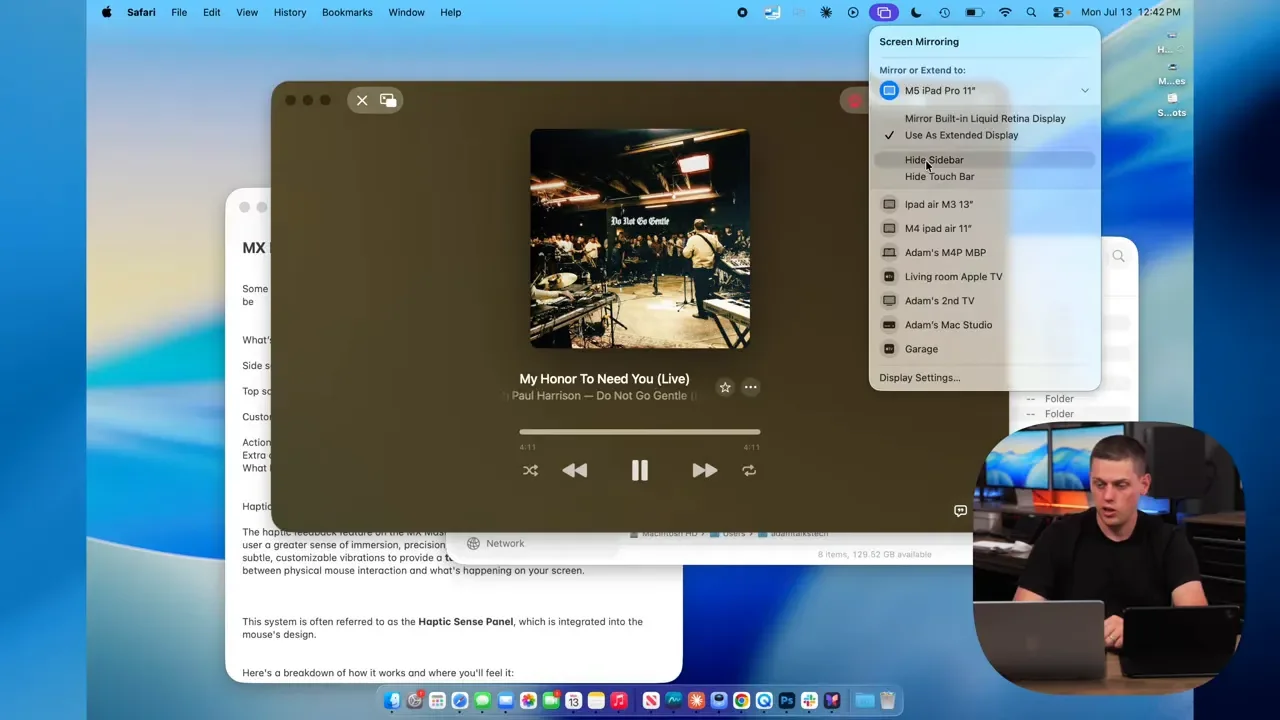
Sidecar is a built-in macOS and iPadOS feature that turns an iPad into a second display for a Mac. The iPad can either extend your Mac desktop or mirror it. In extended-display mode, you can drag Mac windows onto the iPad and use the extra screen space for nearly anything: Finder, email, reference material, video playback, editing controls, or a full-screen app. It is an easy way to get more room without buying a dedicated monitor.
Mac and iPad Requirements
Sidecar requires a compatible Mac and iPad. On the Mac side, you generally need a Mac from 2016 or later, although there are a few model-specific exclusions. The iPad needs to be running iPadOS 13 or later.
Compatible iPads include:
Any iPad Pro
iPad, 6th generation or newer
iPad mini, 5th generation or newer
iPad Air, 3rd generation or newer
If your gear meets those basics, you are most likely good to go.
Account and Connection Requirements
Before Sidecar will connect, both devices need to be signed in to the same Apple Account, with two-factor authentication enabled. For a wireless Sidecar connection, keep the Mac and iPad within 10 meters, or roughly 30 feet, of each other. Wi-Fi, Bluetooth, and Handoff must all be enabled on both devices. Also, the iPad cannot be sharing a cellular connection, and the Mac cannot be sharing its internet connection. For a wired setup, the key extra step is simple: when prompted, choose to trust the Mac from the iPad.
Setting Up Sidecar Wirelessly
Wireless Sidecar is the fastest way to get going. First, confirm that Wi-Fi, Bluetooth, and Handoff are turned on across both devices.
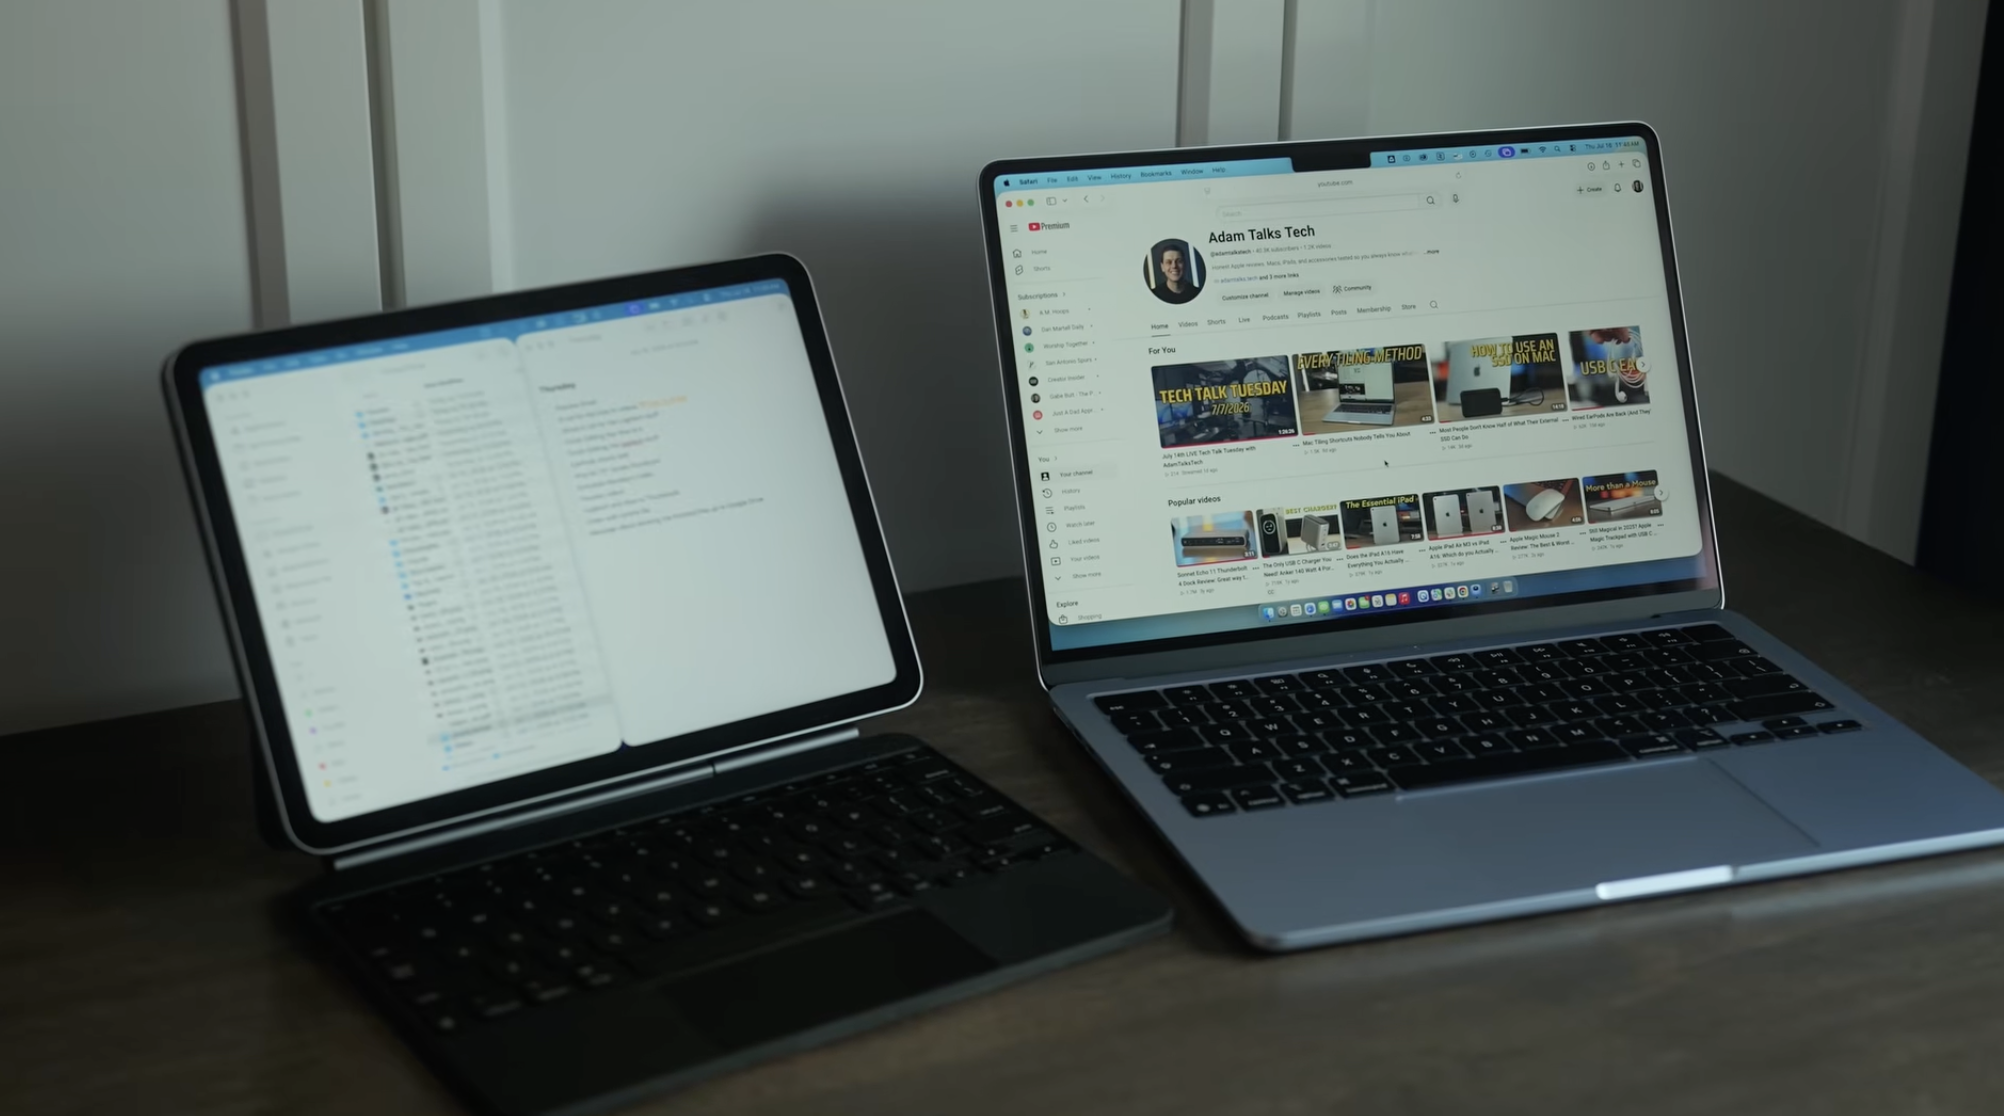
Open Control Center on your Mac.
Select Screen Mirroring.
Choose the iPad you want to connect.
The iPad display should switch on and become an extension of your Mac desktop. From there, simply drag windows from the MacBook display to the iPad.
If you want both screens to show the exact same thing instead, select the option to mirror the built-in Liquid Retina display. Mirroring is useful for showing the same content in two places, but it does not give you any additional workspace.
Sidebar and Touch Bar Settings
Sidecar can show a sidebar of shortcuts on the iPad and a virtual Touch Bar. These controls can be useful, but they also take away valuable screen space. I generally leave both the sidebar and Touch Bar off. The entire point is getting more room, so I would rather have the iPad display available for actual windows. If you rely on the shortcuts, though, turn them on and see whether they improve your setup.
Wireless Tradeoffs: Battery and Lag
Wireless Sidecar is convenient, especially when you are moving around or just need a second display for a few minutes. The tradeoff is that it can drain the battery on both the iPad and MacBook fairly quickly. You may also notice occasional lag. Wireless performance depends on Wi-Fi and Bluetooth conditions, including speed, interference, and how busy the connection is. For static reference material or email, that is usually not a major issue. For anything that needs a responsive display, it can be frustrating.
Setting Up Sidecar Wired
If you want the best Sidecar experience, use a cable. Connect the iPad directly to the Mac with a USB-C cable, then use the same Control Center > Screen Mirroring path to select the iPad. Use the actual USB-C port on the iPad. If the iPad is attached to a Magic Keyboard, do not plug the cable into the keyboard’s USB-C port. That port will not work for Sidecar. The cable needs to connect directly to the iPad itself.
A wired setup gives you lower latency and keeps the iPad charging from the Mac. If you are concerned about draining the MacBook, plug the MacBook charger into the computer and it can still supply power through its USB-C connection to the iPad. My honest recommendation is simple: if you have a cable nearby, use it. The connection is rock solid, the iPad stays topped off, and the experience is noticeably better. A reliable USB-C cable is a worthwhile accessory for this setup.
Rearranging Your Displays
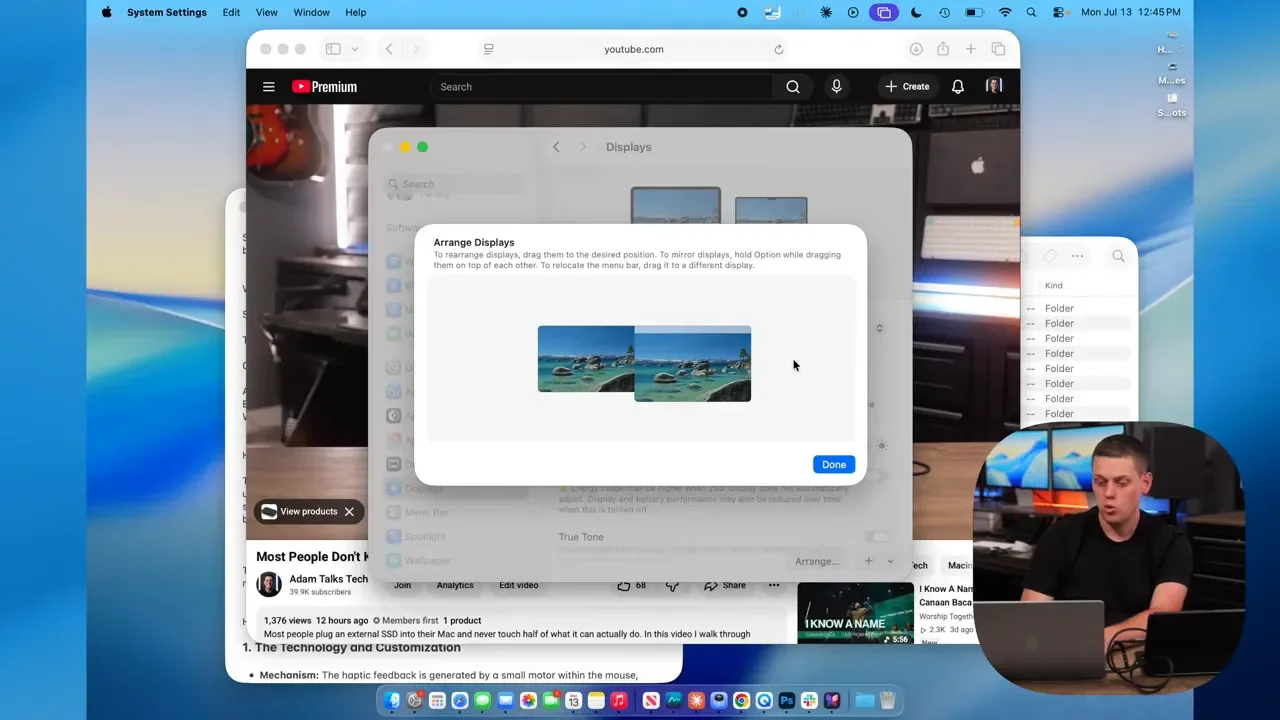
Once Sidecar is connected in extended mode, make the on-screen layout match where the iPad physically sits on your desk. Otherwise, moving the cursor from screen to screen will feel backward.
Open System Settings on the Mac.
Scroll to Displays.
Select Arrange.
Move the iPad display to the left, right, above, or below the MacBook display.
Put the iPad wherever it makes the most sense for the direction you want the pointer and windows to travel.
Moving Windows Between Screens
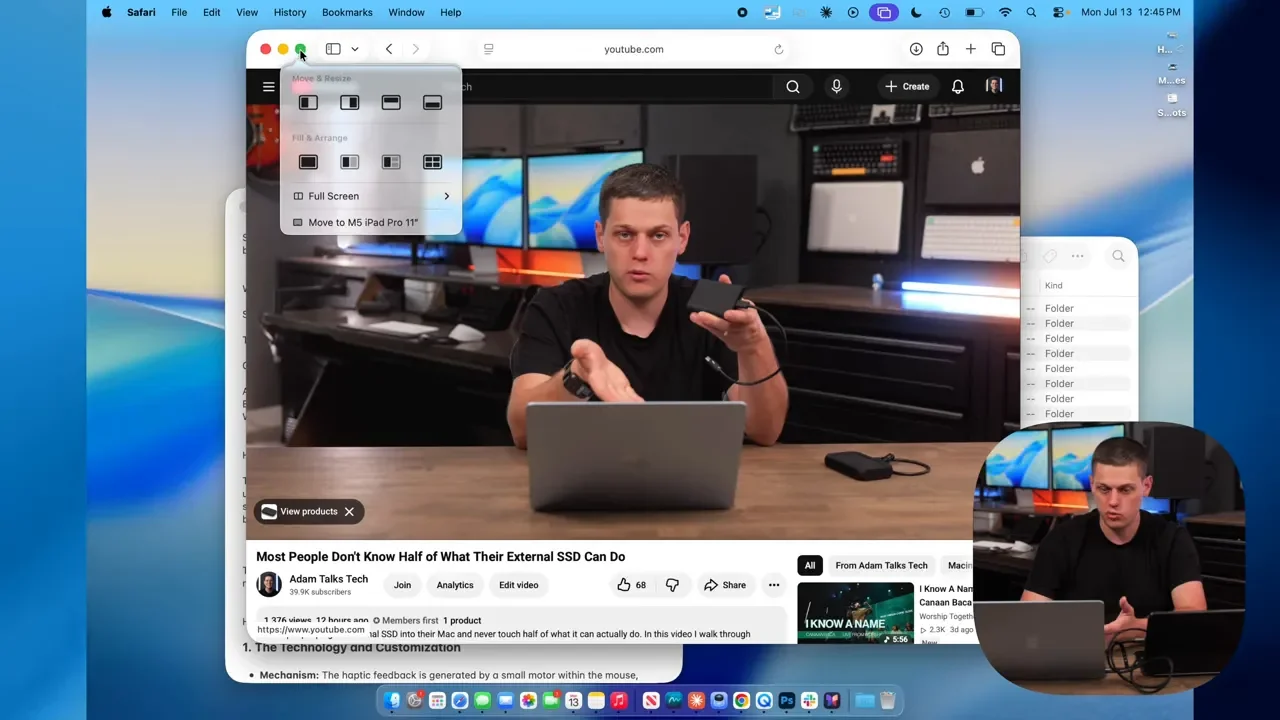
The normal way to move an app is to drag its window from one display to the other. But macOS also gives you a quicker option for supported windows. Hover over the green window button in the top-left corner of a Mac app window. From that menu, choose Move to [Your iPad]. The window moves to the iPad and opens full screen for convenience. This green-button menu can also start Sidecar when it is disconnected. Choose the option to move the app to the iPad, and Sidecar can initiate right from there instead of requiring a trip through Control Center.
Sidecar Limitations: Trackpad, Gestures
There are a few important limitations to understand. If your iPad is in a Magic Keyboard, you can use its keyboard to type, but the Magic Keyboard trackpad does not control the Mac pointer through Sidecar. It is a little strange, but that is how Sidecar works. If you want one keyboard and trackpad or mouse to operate the Mac and iPad as separate devices, that is a job for Universal Control.
Sidecar does support several useful iPad gestures while interacting with Mac content:
Scroll: Swipe with two fingers.
Copy: Pinch in with three fingers.
Cut: Pinch in twice with three fingers.
Paste: Pinch out with three fingers.
Undo: Swipe left with three fingers.
Redo: Swipe right with three fingers.
You can also temporarily return to regular iPad apps by swiping up to reach the iPad Home Screen. To return to the Mac display, tap the Sidecar button in the bottom-right corner. Keep in mind that switching to an iPad app pauses the Sidecar session.
Sidecar vs Universal Control
Sidecar and Universal Control get mixed up constantly, but they do different things. Sidecar turns the iPad into a Mac display. The iPad shows your Mac desktop and Mac apps. You can move those Mac windows over to the iPad and work with them there.
Universal Control keeps both devices separate. The iPad continues to show its own Home Screen and run its own iPad apps, while one keyboard and mouse or trackpad can move between the Mac and iPad. It is also the better option for moving files between devices that are running their own separate interfaces. If you need a second screen for your Mac, use Sidecar. If you need one input setup for two independently running Apple devices, use Universal Control.
Best Uses for Sidecar
Sidecar is excellent for adding workspace without buying a second monitor. iPad displays are color accurate, so they are useful for editing work, and Sidecar can even turn the iPad into a pressure-sensitive drawing tablet in certain apps, including Photoshop and Illustrator.
Some of the best practical uses include:
Keeping email, Finder, or messages on the iPad while your primary work stays on the MacBook.
Putting reference images, notes, scripts, or research on a second screen.
Using one display for a video-editing timeline and the other for reference points or project assets.
Creating a portable dual-screen workspace at a coffee shop, hotel, or anywhere else you are working on the go.
Using the iPad as a drawing surface in compatible creative apps.
For more ideas on building out a portable or desk-based workspace, check out my desk setup walkthrough.
Battery Drain and Latency Tips
For shorter sessions, wireless Sidecar is totally fine. For longer work sessions, plan ahead. It will drain the iPad battery faster, and it can also put a real dent in the MacBook battery.
Here is the practical setup advice:
Use a USB-C cable whenever latency matters.
Use wired Sidecar for editing, drawing, or long work sessions.
Keep the MacBook plugged into wall power when possible.
Bring a power bank when working away from an outlet.
Use wireless Sidecar when portability and a clean desk matter more than perfect responsiveness.
For cables, power banks, chargers, and the rest of the gear I use, see my full gear recommendations.
Final Verdict
Sidecar is a legitimately useful free second-display solution if you already have an iPad. It is not a full replacement for a large dedicated monitor, and wireless mode has real battery and latency tradeoffs. But for a portable setup, reference display, creative workflow, or extra space on a MacBook, it can be a game changer. Use wireless Sidecar when convenience is the priority. Use a cable when you want the best performance, charging, and a stable connection. Either way, it is worth trying before spending money on another display.