How to Set Up an External SSD on Mac: The Complete Guide
Some of the links in this post are affiliate links, which means I may earn a small commission if you choose to make a purchase at no extra cost to you. As an Amazon Associate, I earn from qualifying purchases. Read my full Ethics & Affiliate Relationship Disclaimer.
Table of Contents
Intro
An external SSD can do a lot more than hold a few extra files. You can use one to expand a small Mac’s storage, protect sensitive data with encryption, run apps, create a separate macOS environment, move your Home folder, and build a solid Time Machine backup system. The key is setting it up for how you actually plan to use it. Cable speed, drive format, encryption, and whether the drive stays connected all make a real difference.
Choosing the Right Cable
Almost any external SSD will work with a Mac, and most portable SSDs are bus powered. That means the drive gets its power straight through the cable, with no separate power brick needed. The cable is where people get tripped up. USB-C describes the connector shape, not the speed. Two cables can look identical while supporting very different standards, such as USB 3.2, USB4, or Thunderbolt.
Start with the cable included with the SSD. If you need a replacement, get a quality USB4 or Thunderbolt 4 cable. Your transfer speed is always limited by the slowest part of the chain:
The external SSD
The cable
The port on the Mac
If one link is slower, you will not get the speed printed on the SSD box, no matter how fast the other parts are.
Connecting the Drive to Your Mac
Plug the external SSD into your Mac. It should appear in one of two places:
On the desktop as a drive icon
In Finder under Locations in the sidebar
Once it appears and is mounted, it works just like any other folder on your Mac. You can open it, create folders, drag files onto it, and organize it however you want.
Fixing a Drive That Won't Show Up
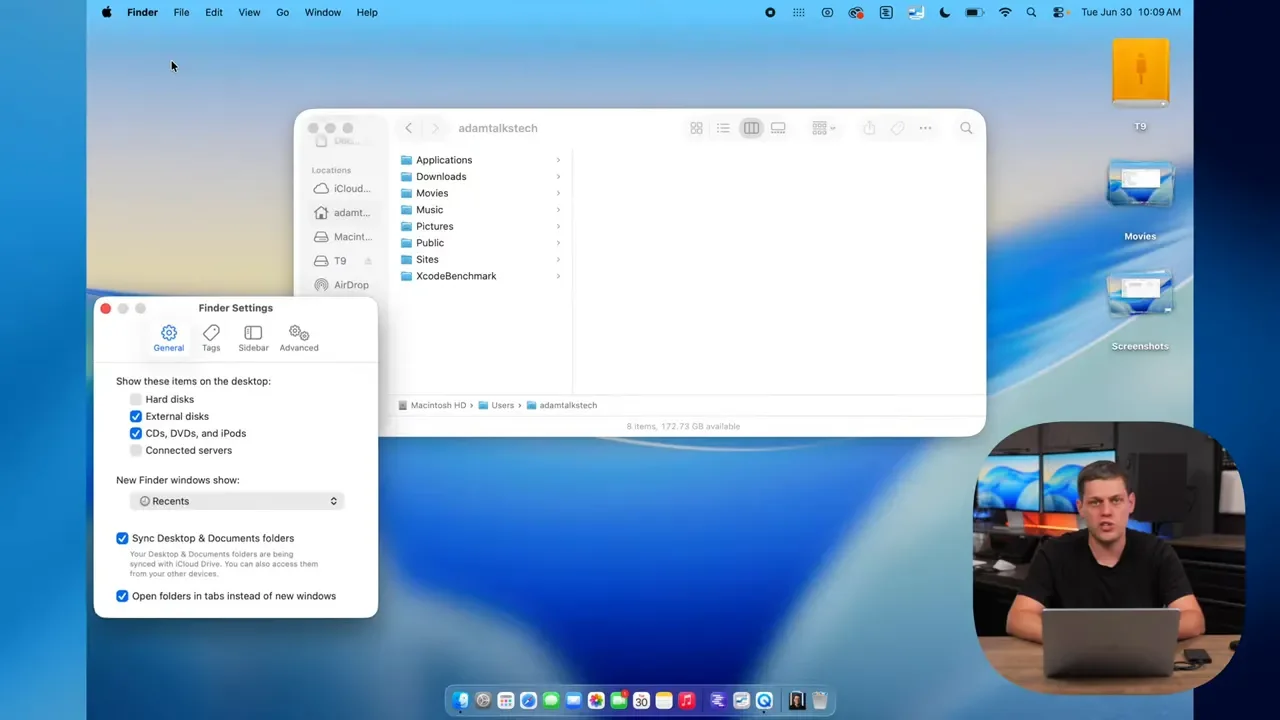
If the drive is connected but you cannot find it, first check Finder’s display settings. In Finder, go to Finder > Settings.
Under General, make sure External disks and Hard disks are enabled if you want drives to show on the desktop.
Under Sidebar, make sure external disks are enabled so they appear under Locations.
If the drive was previously ejected or still refuses to appear, open Disk Utility. This built-in Mac app gives you more control over connected storage. If the SSD is listed but not active, the button may say Mount instead of Unmount. Click Mount to make it available again.
Copying vs Moving Files
When you drag a file from your Mac’s internal storage to an external SSD, macOS copies it by default. The original stays where it was. If you want to truly move the file and remove it from the original location, hold Command while dragging it to the external drive. This is useful when you are trying to free up internal storage, but make sure the transfer completes before assuming the original is safely moved. Files stored in the cloud may need to download to the Mac before they can be moved. That can add time before the transfer itself even begins.
Why You Should Always Eject Safely
This is the step people skip and regret. Even when a transfer progress bar looks finished, macOS may still be writing buffered data to the physical drive. Pulling the cable too early can corrupt a file, sometimes without any obvious warning until you need that file later.
Safely eject the SSD every single time before unplugging it. You have three easy options:
Click the eject icon beside the drive in Finder’s sidebar.
Right-click the drive icon on the desktop and choose Eject.
Open Disk Utility and click the unmount icon beside the drive.
Make this your default habit for SSDs and SD cards. It takes one second and can save a lot of pain.
Format Compatibility (exFAT, APFS, HFS, NTFS)
External drives usually arrive pre-formatted, but the format may not match your use case. You can check the current format in Disk Utility by selecting the drive and looking at its volume information.
exFAT
exFAT is the choice when you need to move files between Mac and Windows computers. It works on both without extra software, which is why many SSDs come formatted this way out of the box.
APFS
APFS is Apple’s modern native file system and my default recommendation for a drive that will only be used with Apple devices. It offers the best performance on a Mac and supports useful features such as encryption, cloning, and snapshots. If the SSD is dedicated to a Mac, iPhone, or iPad workflow, APFS is usually the right answer.
HFS or Mac OS Extended
HFS, also called Mac OS Extended, is the older Apple format. It still works fine, and older versions of macOS use it for Time Machine. On a newer Mac, APFS is generally the more modern and robust option.
NTFS
NTFS is the standard Windows format. A Mac can read an NTFS drive, but it cannot write files to it without third-party software. If an SSD from a Windows PC opens on your Mac but will not let you save anything, NTFS is likely the reason. Pick the format based on your real use case, not just what the drive shipped with.
Encryption Setup
If the drive contains personal files, client work, financial records, or anything you would not want a stranger to access, encryption is worth using. If the SSD gets lost or stolen, encrypted data is unreadable without the password. On an M-series Mac, encryption has almost no meaningful performance cost because the chip handles it in hardware.
There are two ways to encrypt an external SSD:
Finder encryption: Right-click the drive in Finder and choose Encrypt. This is fast, but it only protects files added after encryption is enabled. Existing files are not retroactively protected.
Disk Utility encryption: Erase and format the SSD as an encrypted APFS volume. This is the cleaner and more secure route because the entire drive starts encrypted.
Do not forget the password. There is no recovery trick, Apple support workaround, or backdoor for an encrypted drive. Store the password in a password manager or another secure place you will actually be able to find later.
Erasing and Formatting the Drive
Formatting deletes the files on the SSD, so back up anything important first. Copy it to your Mac, cloud storage, or another drive before you continue.
To format an external SSD properly:
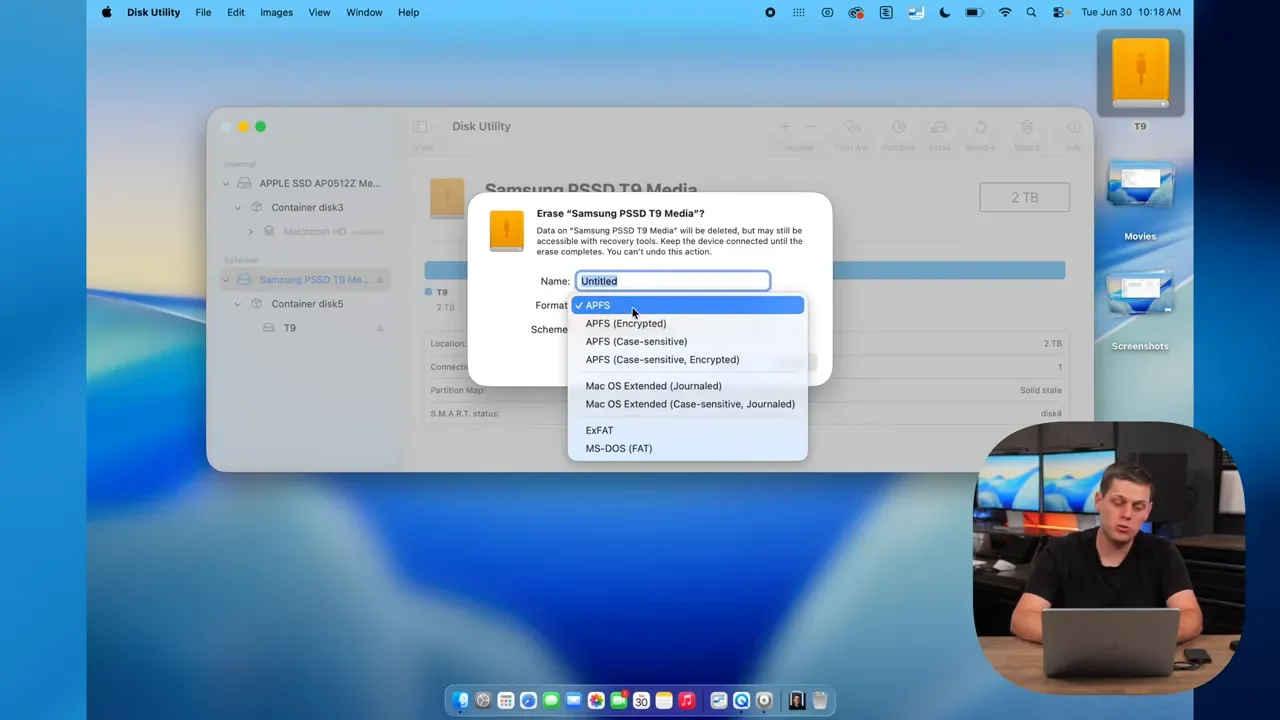
Open Disk Utility.
If you only see volumes, press Command + 2 to show all devices.
Select the external drive itself, not your internal Macintosh HD.
Click Erase.
Give the drive a name.
Choose the format that matches your use case.
Leave the scheme set to GUID Partition Map in most cases.
Click Erase and wait for the process to finish.
For a Mac-only SSD, choose APFS or APFS Encrypted. Use Mac OS Extended for older-device compatibility, or exFAT if the drive needs to move between Windows and Mac. After formatting as APFS Encrypted, macOS may not ask for the password again until you safely eject and reconnect the drive. That is normal. On reconnection, the password prompt verifies that the encryption is working.
Running Apps Off an External SSD
One of the best ways to make a 256GB base-model Mac more usable is to move larger apps to an external SSD. Copy the app from the Applications folder onto the SSD, then open it directly from there. Most apps run fine this way. It can reclaim a meaningful chunk of your internal storage without forcing you to uninstall software you use.
There are exceptions. Apps with deep system integration, certain Adobe security tools, and system utilities may refuse to move or relaunch from external storage. Test the specific app. If it works, great. If not, leave it on the internal drive. Drive speed matters much more here than it does for plain file storage. A USB4 or Thunderbolt 4 SSD can operate at speeds much closer to internal Mac storage. An older USB 3.2 SSD is usually fine for lighter apps, but large creative tools such as Final Cut, Lightroom, and Logic can feel slower to launch and less responsive. For fast external storage, check out these recommended high-speed SSDs. If you are looking for a more budget-friendly option, these cheaper SSDs are worth considering.
Installing macOS on an External Drive
You can install a completely separate copy of macOS on an external SSD. This is useful for a clean testing environment, troubleshooting, or a portable setup that behaves the same way across different compatible Macs. Think of it as having a separate Mac environment in your pocket. Your primary internal installation stays untouched while the external drive provides its own operating system setup.
Moving Your Home Folder
Your Home folder is the core of your personal Mac environment. It contains your Desktop, Documents, Downloads, Pictures, Movies, and other personal data. Moving it to an external SSD can make sense if you have a 256GB Mac and need your files to live on a much larger drive. It can also help separate your personal data from the operating system for portability or backup reasons.
Start by copying, not moving, your user folder:
In Finder, open Macintosh HD > Users.
Find your user folder and copy it to the external SSD.
Wait for the copy to finish completely.
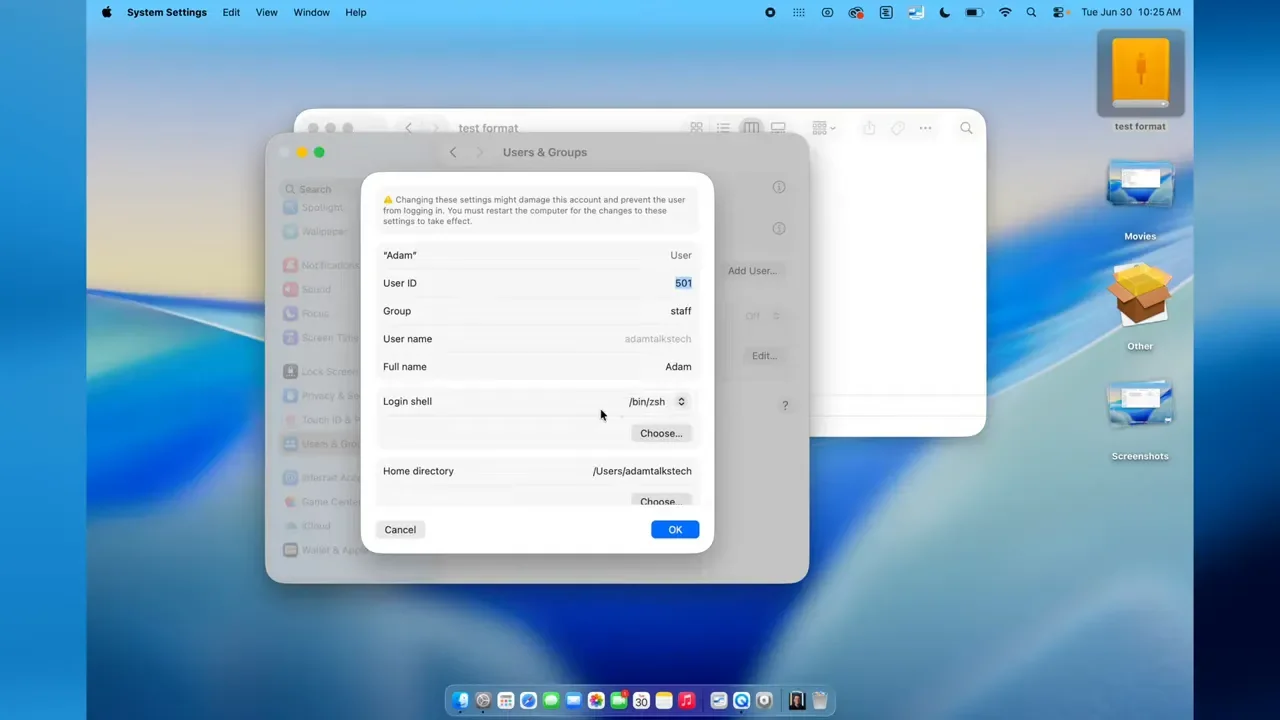
Open System Settings > Users & Groups.
Right-click your user account and choose Advanced Options.
Enter your password when prompted.
Find Home directory, click Choose, and select the copied folder on the external SSD.
Click Open, confirm the change, and restart the Mac.
There are a couple of important caveats. iCloud Desktop and Documents sync may disable itself or throw an error after the folder path changes. If that happens, go back into iCloud settings and re-enable it. I would only use this setup with a Mac mini or a desktop Mac where the external SSD stays connected permanently. On a laptop, an accidental disconnect can cause errors and require a restart. Pairing a desktop Mac with a fast Thunderbolt SSD that lives on the desk is a much safer use case.
Time Machine Setup
Time Machine is the Mac’s built-in backup system. When a backup drive is connected, it can automatically keep hourly backups for the last 24 hours, daily backups for the last month, and weekly backups further back. That version history is the real value. If you delete a file, overwrite something, or make a change you regret, you can go back to an earlier version.
To set it up:
Open System Settings.
Go to General > Time Machine.
Select the connected external SSD.
Choose Set Up Disk.
Choose whether to encrypt the backup and create a password if needed.
Optionally set a storage limit for Time Machine on the drive.
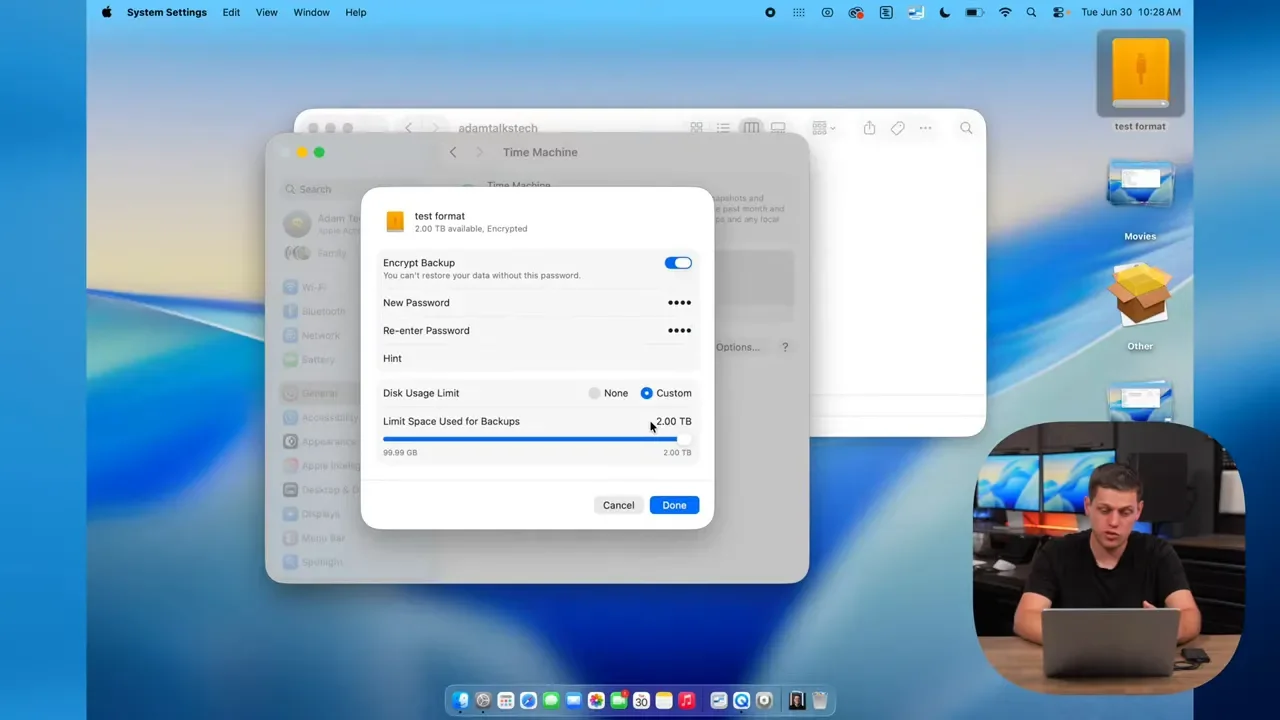
Depending on how the SSD is currently formatted, macOS may need to erase it before it can use it for Time Machine. Also, when you dedicate a drive to Time Machine, treat it as a backup drive rather than general file storage.
A good capacity rule is to choose a Time Machine drive with roughly two to three times your Mac’s internal storage:
A 512GB Mac pairs well with a 1TB or 2TB backup drive.
A 1TB Mac should generally use at least a 2TB backup drive.
By default, Time Machine backs up everything. You can open Time Machine settings, go to Options, and exclude folders you do not care about, such as disposable Downloads content, huge cache folders, or certain app support files. One important distinction: Time Machine is not a bootable one-to-one clone of your Mac. It is designed to preserve versions of your files over time.
Final Recommendations
For most Mac-only use, format the SSD as APFS, or use APFS Encrypted if the drive will hold anything sensitive. Use exFAT only when you genuinely need Windows and Mac compatibility. If you are simply storing files, almost any decent portable SSD will do the job. If you want to run apps, keep a Home folder on the drive, or use an external macOS installation, pay for speed and use USB4 or Thunderbolt 4. Always use a quality cable, always safely eject the drive, and always make sure your important files exist in more than one place. An SSD is incredibly useful, but it is not a backup unless you have another copy of the data somewhere else.