OWC Studio Stack Review: A Clean Thunderbolt 5 Hub and SSD Upgrade for Mac Studio
Some of the links in this post are affiliate links, which means I may earn a small commission if you choose to make a purchase at no extra cost to you. As an Amazon Associate, I earn from qualifying purchases. Read my full Ethics & Affiliate Relationship Disclaimer.
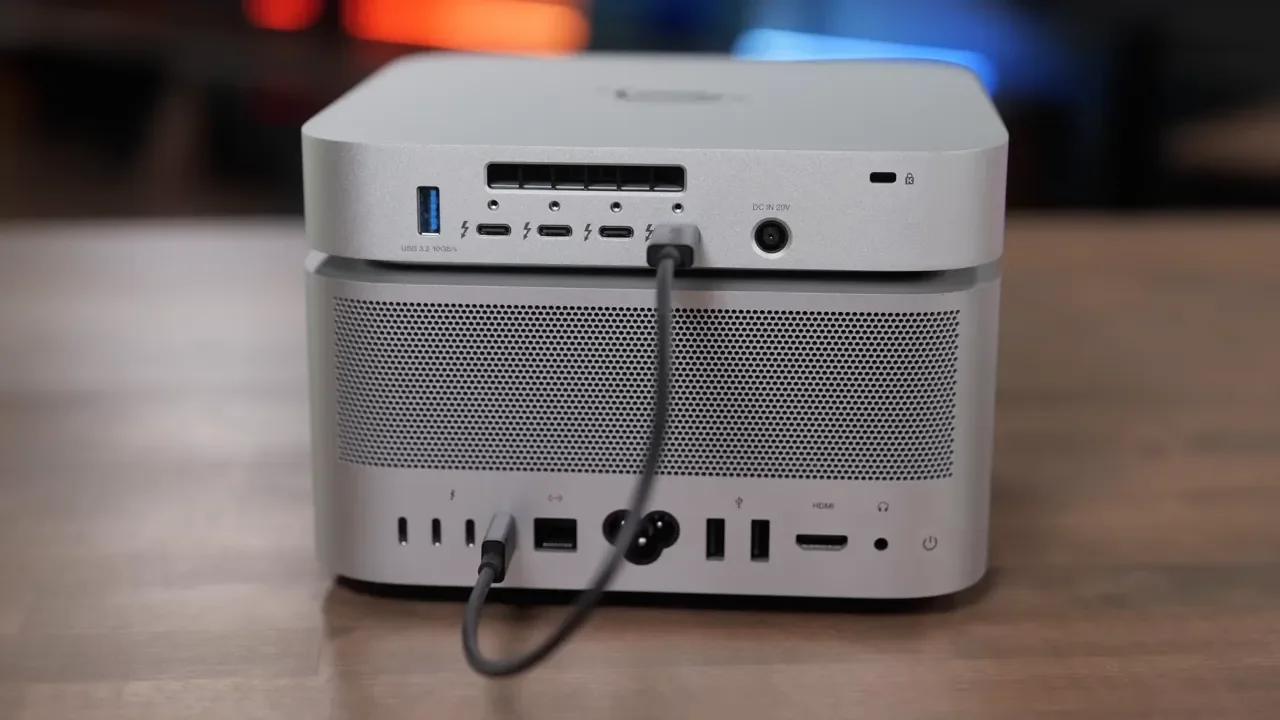
If you’re running out of ports and storage on a Mac Studio, the OWC Studio Stack is one of the cleanest upgrades I’ve seen so far. It combines a Thunderbolt 5 SSD enclosure and a hub in a design that’s clearly meant to sit right under a Mac Studio and look like it belongs there.
Connect a single Thunderbolt cable, plug in the power supply, and you get fast NVMe storage, a SATA bay for larger-capacity drives, and extra Thunderbolt plus USB-A ports without turning your desk into a mess of adapters and separate boxes. That combination is what makes this product interesting. It’s not just another dock, and it’s not just another SSD enclosure. It’s trying to solve both problems at once for Mac Studio owners who want more storage and more connectivity in one tidy setup.
What The OWC Studio Stack Adds To A Mac Studio
At a basic level, the Studio Stack gives you two kinds of expansion:
Fast NVMe storage through its internal SSD slot
Extra ports through an integrated Thunderbolt hub
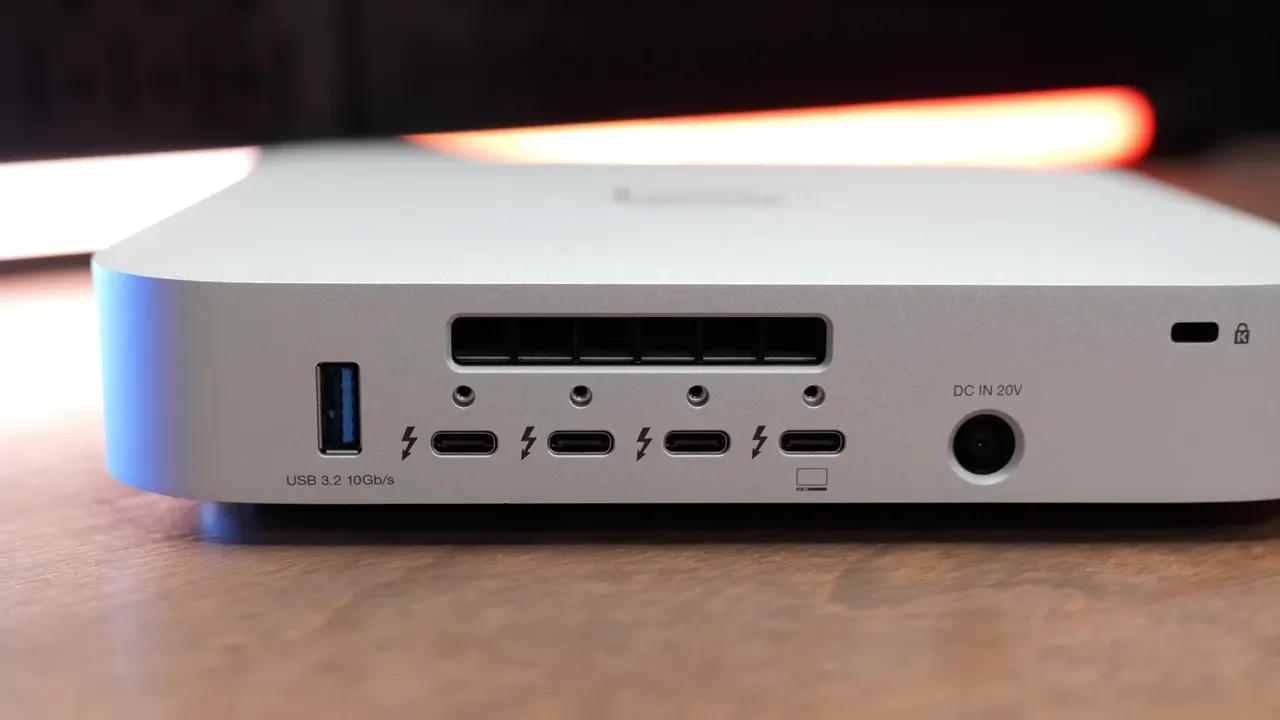
It also includes a SATA drive bay, which is useful if you want a larger drive for backups, archives, or Time Machine. On the outside, the port selection is refreshingly focused. Instead of loading it up with network ports and a bunch of extras you may not need, OWC kept it centered on the kinds of connections that make the most sense for a Mac Studio workflow.
You get:
Three additional Thunderbolt ports on the back
One USB-A port on the back
Two USB-A ports on the side
One host Thunderbolt connection back to your Mac

That makes it easy to keep things like external displays, storage, a Stream Deck, card readers, and older USB accessories connected without reaching around behind the Mac every time.
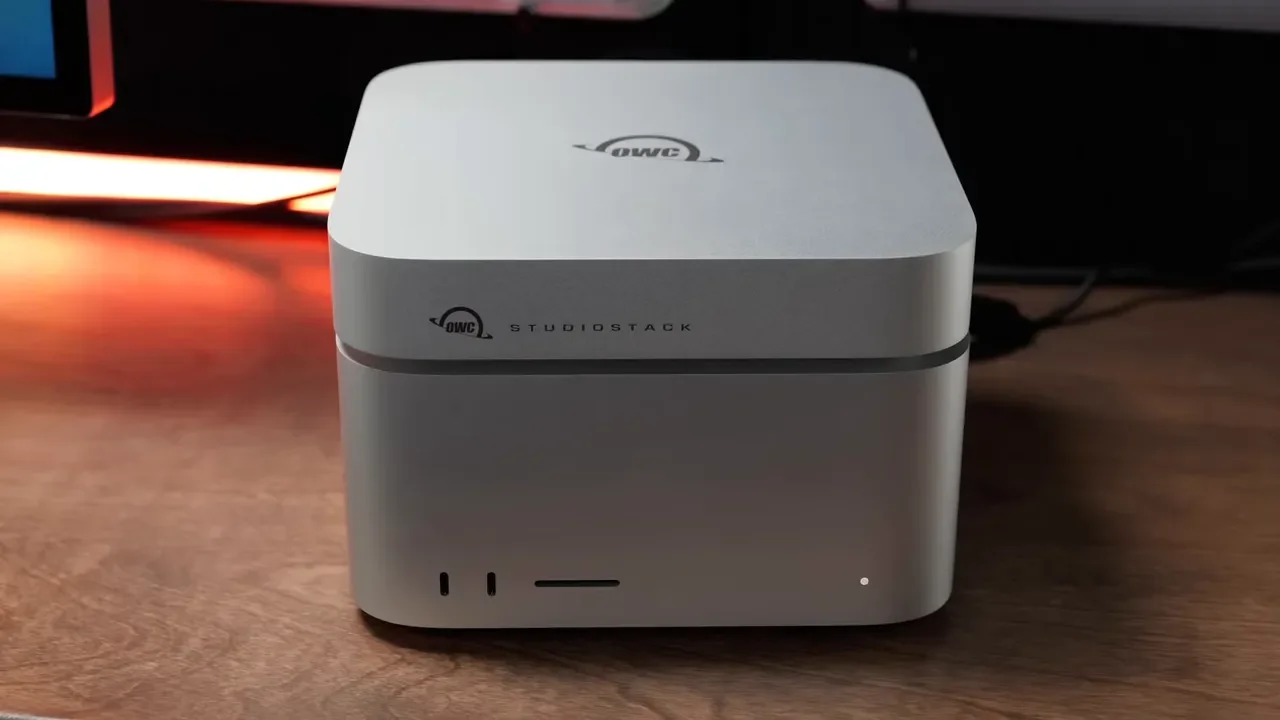
The Design Is The Big Selling Point
The first thing that stands out is how well this matches the Mac Studio aesthetic. The enclosure is clearly designed to look at home on the desk next to Apple hardware, and if you care about having a setup that feels intentional instead of pieced together, that matters more than it sounds. There’s also something nice about getting everything you need in one enclosure. A lot of setups end up being a dock plus an SSD enclosure plus extra cables plus another power brick. This avoids that.
That said, I do have one design complaint. Two of the USB-A ports are on the side. Functionally, that can be useful, but for a desktop setup I would have preferred more rear-facing ports, or maybe even one on the front. I get why OWC did it. It helps preserve the clean look. But from a practical standpoint, back-mounted ports would have made more sense for permanently connected accessories. There’s also a blower fan on the back. In day-to-day use, I didn’t find it distracting or especially noisy. If you put your hand behind the enclosure, though, you can definitely feel the airflow, so it is doing real cooling work.
DIY Or Preconfigured: Which Version Makes The Most Sense?
OWC sells the Studio Stack either preconfigured with drives installed or as a diskless DIY enclosure. For most people, I actually think the DIY version is the better buy.
Here’s why:
You can choose the exact NVMe size you want
You can decide whether you even want a SATA drive inside
You can use a hard drive for cheaper bulk storage or a SATA SSD if you prefer silent operation
If your goal is to use the NVMe slot for active projects and the SATA slot for Time Machine or long-term storage, building it yourself gives you more control over cost and capacity. And it’s worth remembering that macOS sees the installed drives as external drives. That means you can use them the same way you’d use any external SSD or hard drive for copying files, editing projects, or backups.
Installing The Drives
If you buy the enclosure without drives, installation is pretty straightforward. Remove the bottom plate, and underneath you’ll find the NVMe slot and the SATA bay.
To install the NVMe SSD:
Insert the SSD at an angle
Press it down into place
Secure it with the screw
For a SATA drive, you place it into the sled, slide it into the SATA slot, and secure it with four screws around the perimeter.
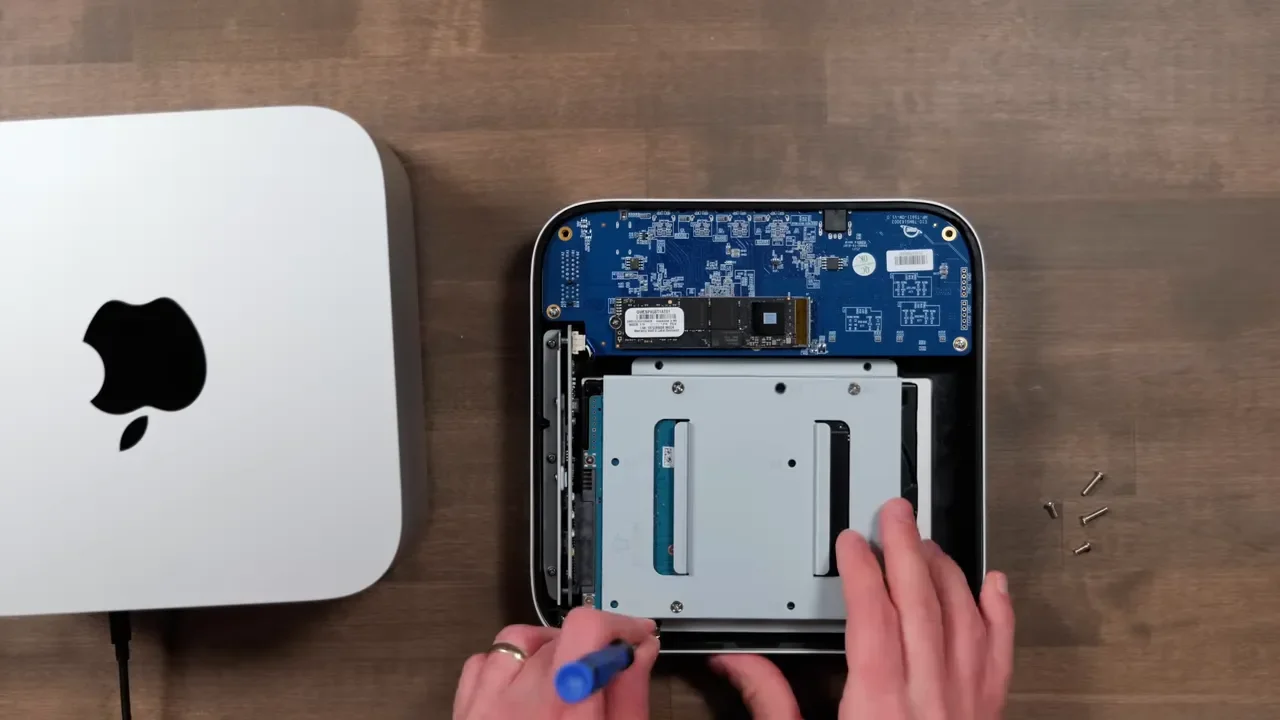
OWC also built some thermal management into the enclosure. The bottom plate uses a thermal coupling design that helps pull heat away from the NVMe drive and into the chassis itself. That’s important on a fast Thunderbolt 5 enclosure because sustained SSD performance depends a lot on keeping temperatures under control. Another small touch I like is the indicator lighting. The enclosure provides status lights for the NVMe, the SATA drive, Thunderbolt connection, and power, so it’s easy to tell what’s active.
What’s Included In The Box
OWC includes:
A short Thunderbolt 5 cable
The power adapter
The labeled power supply is a nice touch. If you have a desk full of gear, clearly marked adapters save a lot of guesswork. You do need the external power brick because the Studio Stack can provide up to 60W of power to the host connection. That matters more if you want to use it with a laptop, since it can power the laptop over Thunderbolt. On a Mac Studio or Mac mini, that power delivery isn’t as important because those machines already have their own power supplies, but it explains why the enclosure can’t run bus-powered.

Thunderbolt 5 Performance and Real-World SSD Speeds
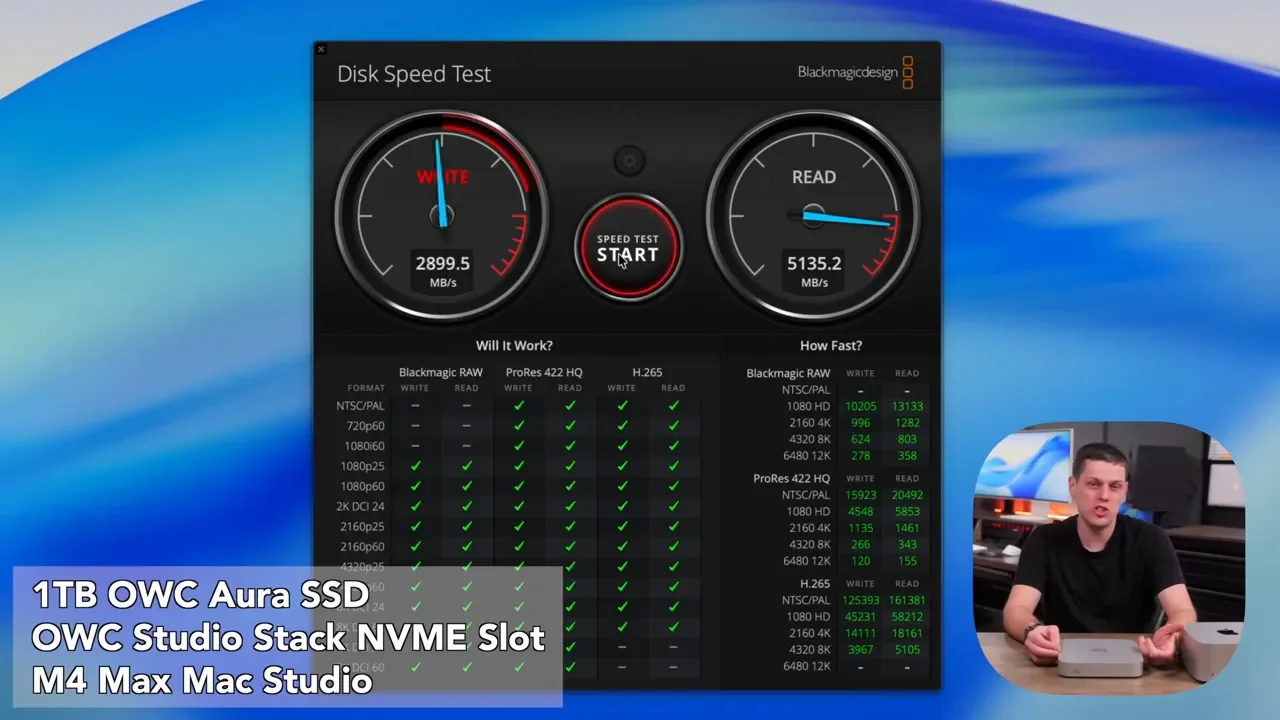
The main reason to buy the Studio Stack is the NVMe slot. OWC rates it for up to 6,300 MB/s read and write, which puts it firmly in high-performance external SSD territory.
In my testing with an M4 Max Mac Studio, I saw:
About 4,000 MB/s write
About 5,000 MB/s read
Those numbers were with the preinstalled OWC Aura SSD. I also tested it with a Samsung 9100 Pro Gen 5 SSD, and that delivered faster results than the stock OWC drive. So if you go the DIY route and want to maximize performance, the SSD you choose absolutely makes a difference. For the installed hard drive, I saw around 270 MB/s read and write, which is right where I’d expect a mechanical drive to land. That’s not for editing demanding projects, but it’s perfectly fine for backups and larger file storage.
Performance on Thunderbolt 3 and 4 Macs
The Studio Stack will also work with Thunderbolt 3 and Thunderbolt 4 systems. You just need to expect lower speeds and less available bandwidth overall. When connected to an M4 Max Mac mini, performance dropped to around 3,000 MB/s for both read and write. Still fast, still useful, but not the same level you get from a full Thunderbolt 5 setup.
Bandwidth Limits Are Real
Thunderbolt 5 has a lot of bandwidth on paper, but that bandwidth still gets shared across what you have connected. In practice, I noticed that when external monitors and other peripherals were plugged into the Studio Stack, the SSD speeds dipped a bit. That’s not surprising, but it’s worth keeping in mind if you’re expecting the absolute maximum performance all the time. I also pushed the Thunderbolt ports hard with multiple high-speed devices. This is where I ran into some limits.
With:
Three Thunderbolt 5 SSDs connected
Plus a Studio Display
I saw connection drops pretty regularly. That likely comes down to either power draw, bandwidth saturation, or both. With two additional Thunderbolt 5 SSDs and the Studio Display, the setup was stable.
So yes, you can connect displays through the Studio Stack. But if your top priority is getting the fastest possible performance from the internal NVMe drive, I still recommend plugging as many demanding accessories directly into the back of the Mac Studio as you can.
Use the extra ports on the Studio Stack for things like:
Card readers
Less demanding external SSDs
USB accessories
Peripherals that don’t need maximum bandwidth all the time
Fan Noise and Hard Drive Noise
The blower fan never bothered me. It’s there, but it wasn’t annoying in my setup. The mechanical hard drive is more noticeable than the fan. Every so often, you’ll hear that classic hard drive spin-up and whirring sound. It’s not unusually loud, but if you want a near-silent desk setup, that’s something to consider.
If you want to minimize noise, there are a couple of easy ways to do it:
Eject the mechanical drive when you’re not using it, then mount it manually in Disk Utility when needed
Skip the hard drive entirely and buy the enclosure as DIY
Use a SATA SSD instead of a spinning drive
Mac Studio Fit Is Excellent, Mac Mini Fit Is Not
This enclosure is clearly built for the Mac Studio. The size, proportions, and finish all line up nicely. You can use it with a Mac mini, but it’s not nearly as elegant. The included cable is a bit short for that kind of placement, and OWC doesn’t really position this as a stackable Mac mini accessory. So if you use it with a mini, expect to lose some of the visual appeal that makes this product stand out in the first place. I’d love to see OWC make a Mac mini-specific version at some point, because the concept makes a lot of sense.
Price: Is The OWC Studio Stack Worth It?
The pricing actually makes this more compelling than it may look at first glance. The DIY enclosure starts at $330. The configuration I tested, with a 1TB NVMe and 6TB hard drive, typically sells for around $760, though preconfigured pricing can move around depending on storage market conditions. For the enclosure-only version, I think the value is pretty solid.
Here’s the comparison that matters:
A basic Thunderbolt 5 hub is about $190
A separate OWC 1M2 SSD enclosure is about $220
That’s $410 total for two separate devices, two enclosures, more cables, more clutter, and another port consumed to link everything together.
By comparison, the Studio Stack at $330 gives you:
A Thunderbolt 5 SSD enclosure
Extra Thunderbolt ports
USB-A ports
A SATA bay
A much cleaner, more integrated setup
From that angle, the price is actually one of its strengths.
How It Compares To Competing Docks
There are a few other products in this space, but each one makes different tradeoffs.
Satechi’s Upcoming Dock
Satechi has a new dock coming that also leans heavily into aesthetics. It looks good, but it doesn’t match the Mac Studio’s height and finish quite as well. It’s also expected to cost around $400, which puts it above the OWC Studio Stack.
You do get a few more ports on the Satechi option, so if port variety matters more than visual integration, that may appeal to you.
Sonnet Echo 13
The Sonnet Echo 13 is another strong option, and it includes SSD storage at around $370. Functionally, it’s a good product. Aesthetically, though, it’s going in a different direction.
There are more ports visible on the front, which some setups may actually prefer. For me, I like the cleaner look of the OWC Studio Stack better in a Mac Studio environment.
Who Should Buy The OWC Studio Stack?
This is best for someone who wants to expand a Mac Studio with both more ports and more storage in one clean unit.
It makes the most sense if your workflow looks something like this:
You want a fast NVMe drive for active project files
You want a SATA drive for Time Machine, archives, or backups
You need extra Thunderbolt and USB-A ports
You care about having a setup that looks clean and intentional on the desk
The biggest downsides are pretty manageable:
A mechanical drive can add some audible noise
You need space for the external power brick
The extra ports still share Thunderbolt bandwidth, so this is not a magic solution for unlimited expansion
How It Held Up In Real Editing Work
After editing several projects directly off the Studio Stack, I didn’t run into disconnects, and I didn’t see any slowdown in Final Cut Pro. Working with full project libraries on the NVMe felt basically the same as using the internal SSD on the Mac Studio.
Depending on which Mac Studio configuration you have, the SSD in the Studio Stack may even be faster than your internal storage. Lower-capacity Mac Studio configurations, especially 512GB models, can be slower than the 1TB and larger internal SSD options. In that case, a fast external NVMe setup like this becomes even more attractive.
Warranty
Warranty coverage depends on which version you buy:
DIY enclosure: 1-year warranty
Preconfigured with drives: up to 3-year warranty
That’s worth factoring into the buy decision if you’re debating whether to supply your own drives or let OWC handle the full build.
Final Verdict
The OWC Studio Stack is one of the best expansion options available right now for a Thunderbolt 5 Mac Studio. It delivers very fast SSD performance, useful additional ports, support for both NVMe and SATA storage, and it does all of that in a package that actually looks like it belongs next to Apple hardware.
It isn’t perfect. I’d prefer a slightly different USB-A layout, and if you install a mechanical hard drive, you’ll hear it from time to time. But those are small tradeoffs compared to what you’re getting. If you need more storage, more ports, and a cleaner desk setup, this is an easy recommendation.